
Printing Photoshop Channel Separations in AI or Corel Draw
Separations provided by us are done in Adobe Photoshop and are called Channel Separations. Channel separations can easily be printed out of Adobe Photoshop but they need to print to a RIP (raster image processor) like T-RIP in order to get halftone dots.
Note: If you don't have a RIP but want to print from Photoshop you can cheat a little and convert the channels to halftones. There are details and a reason this may not be a great plan later in this article.
For some reason a lot of people are told "you can't print for Photoshop." That is one of the biggest lies ever told and perpetuated by Adobe. It is shocking to hear people tell us "Adobe said I needed to print from Illustrator." Oh well. People print from Photoshop all day long.
If you know about the history/background and reasons to do this….you can jump ahead to just the section about how to print from your favorite vector program.
Why print from Illustrator or Corel?
Good question. A lot of printers want to print from a program they are comfortable with. And, if you want to add additional vector elements to a channel separation you can do so once you bring the file into your favorite vector program – as long as the elements you are adding are one of the Pantone colors used in your image. Also, printers often make templates with registration marks, gray scales and other details that they "place" the separated image in before printing. This keeps everything very uniform.
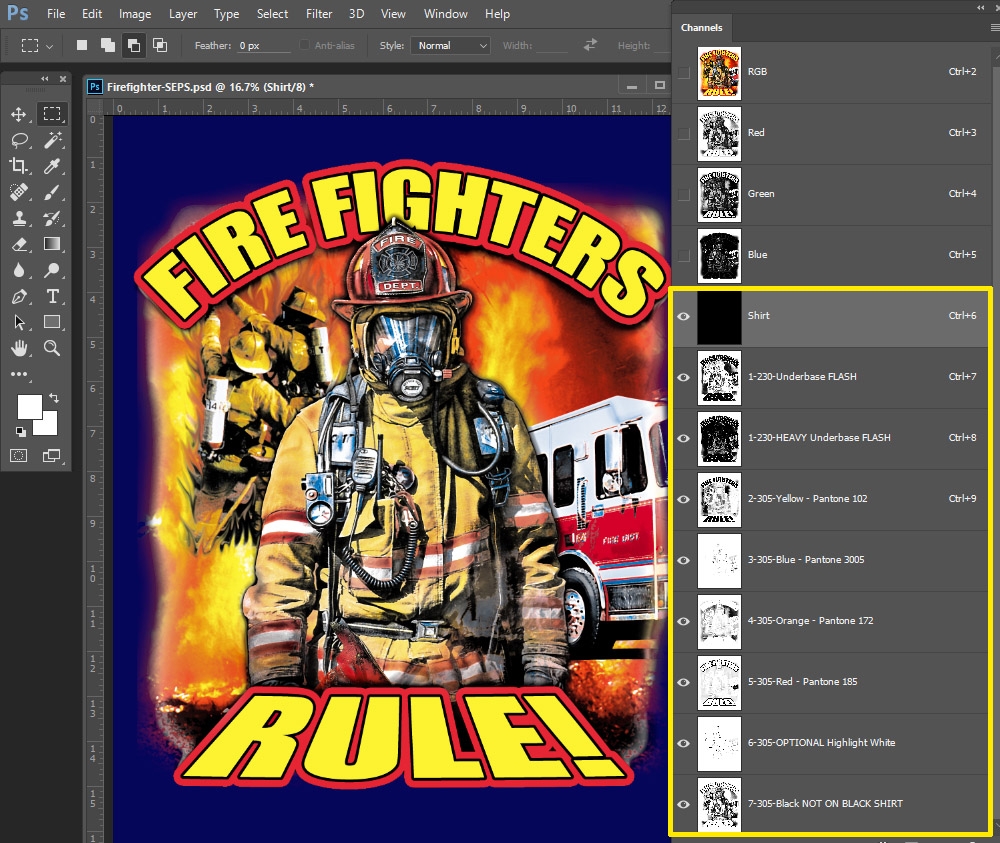
The following image is what a Channel Separation looks like in Photoshop. The file starts off as an RGB file and then each color is "pulled" and/or created and made into what is called a Spot Color Alpha Channel. In Photoshop – any channel that is a Spot Color will print. And a channel that is a Spot Color can be printed out of Illustrator or Corel (RGB does not print but you MUST keep the RGB header in the file).
-
-
Click on image for larger display.

What if you don't have a RIP?
A true RIP converts any gray levels to halftones and tells a "dumb" inkjet printer to lay down a heavier deposit of ink. If you want to print halftones from Photoshop and don't have a RIP then you can convert each channel to halftones – keeping in mind that your printer needs to print very dark and usually on the highest photo quality setting (very slow!). If you don't have a RIP and want to print Photoshop channel separations – here is a short YouTube video about how to do that. BUT… for best results invest in a RIP.
Two ways to print – PDF or DCS 2.0 EPS
Since the 90’s the common way to print separations made in Photoshop to Illustrator or Corel Draw was using the DCS 2.0 EPS format (desktop color separations). It was developed by Quark (page layout program) as a way to bring color separated files into it to print. You would simply “save as” an image in Photoshop as DCS 2.0 and then Place the image in Illustrator or Import the image in Corel Draw and the separations are there as spot colors ready to print.
DCS 2.0 can be a little quirky and with the release of Adobe Illustrator CC 2018 version – Adobe is starting to drop support for this format and with the newer versions of both programs it is much easier to print a PDF file. We will cover DCS 2.0 at the end of this page.
Printing a PDF File in Illustrator CS5+ or Corel X5+
The good news is there is an easy way of opening and printing Photoshop separation files in Illustrator if you have CS5 or newer or Corel Draw X5 or newer. In Photoshop you can simply save the file as a PDF (portable document format) and Open (not Place) the file in AI or Open the file in Corel Draw.
Here are the basic rules to follow before saving the file as a PDF in Photoshop. These rules are just for your information. When you get a PDF color separation file from us we take care of everything and the is ready to us in your favorite graphic program.
-
Leave the RGB header in the Photoshop file
When making a Channel Separation in Photoshop you must keep the RGB “header” in the file. And all of the separation channels must be set to Spot Color. If you have deleted the RGB header and/or if the separation program you are using deletes the RGB then you need to make another. Simply create three new Spot Channels in the Channels Panel and drag them to the top. Yes, they are blank but it won’t matter.
Next go to Image/Mode and click on RGB. Without the RGB header the file is Multi-Channel in Photoshop and Illustrator and Corel won’t like it. If the Channel Header (channels above your separations) is CMYK then convert it to RGB by going to Image/Mode RGB.
-
Remove unnecessary channels
In Photoshop remove any channels you don’t need to print (other than the RGB). Some separation software makes a “Shirt” channel for reference. You can keep it or delete it. Deleting it keeps it from showing up as a print channel in AI or Corel.
-
Use Non-Traditional Channel Names
For your separation channel header names do NOT use any names for CMYK colors like Black, Yellow, Magenta or Cyan. The file will get converted to a CMYK header in Illustrator or Corel and even though you don’t print these – the program will get confused if you have two channels of the same name. If you do need to use “Black” as a channel name – make it something like “Spot Black.”
-
Make Adjustments in the PDF Window
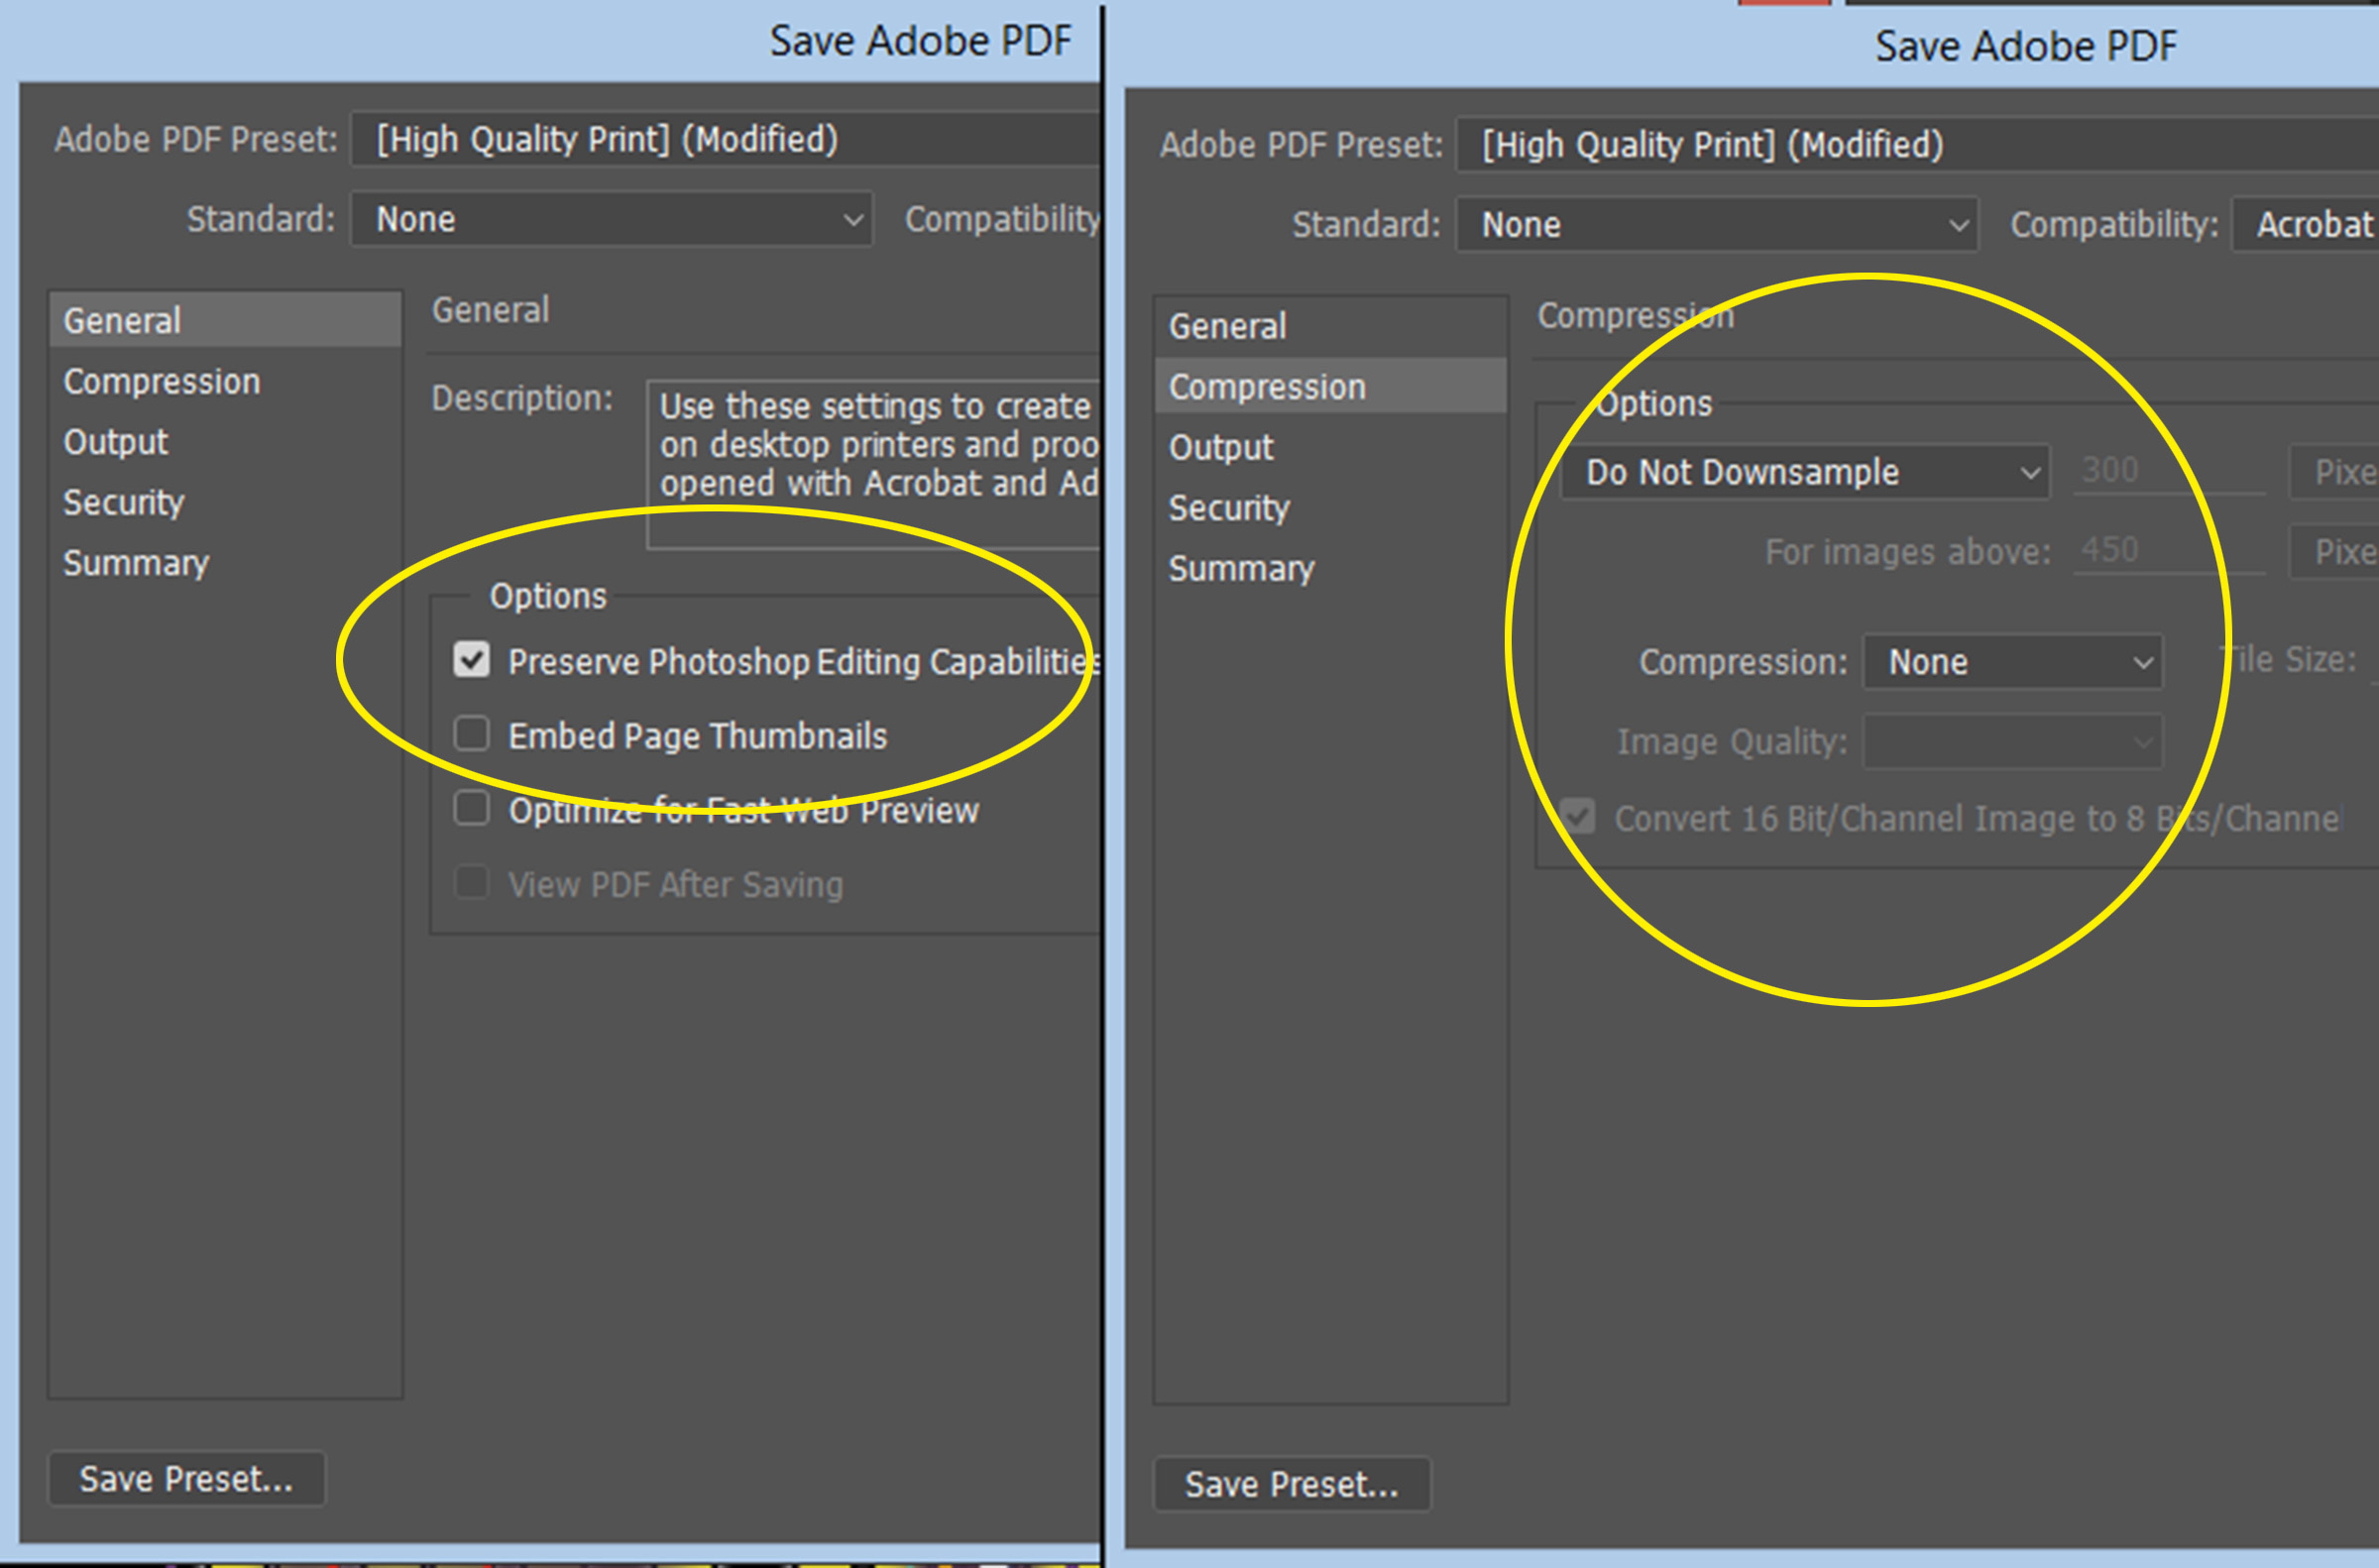
When saving the file as a PDF in Photoshop turn off any compression in the PDF window in order to keep the file as high quality as possible and make sure to Check Preserve Photoshop Editing Capabilities.

Printing a PDF from Adobe Illustrator CS5 or newer to a RIP
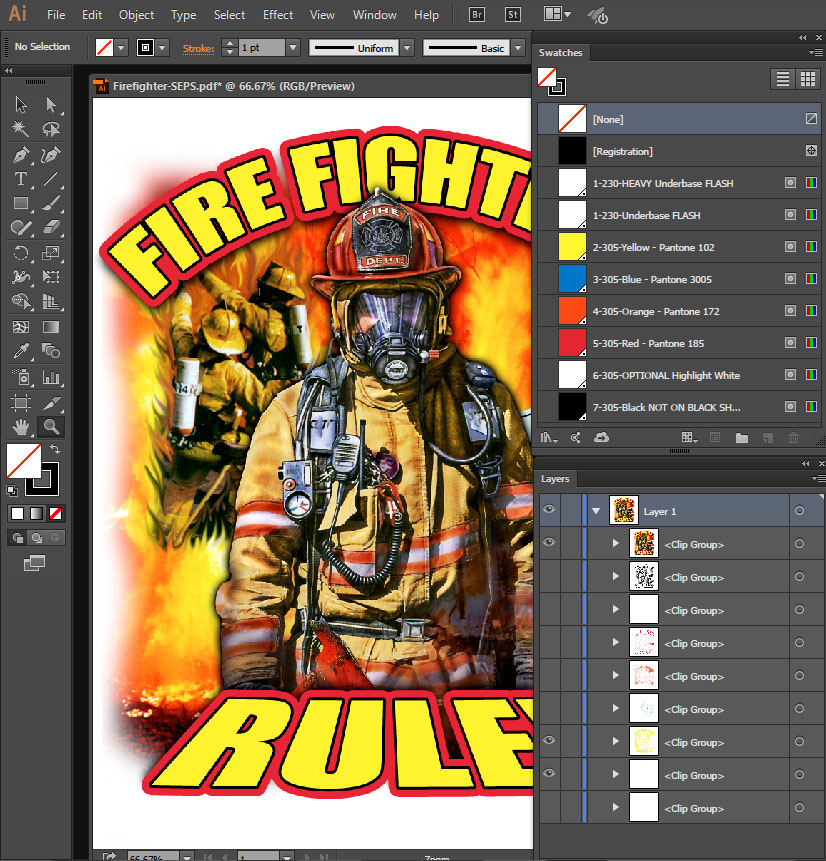
To use the file in Illustrator CS5 or newer simply Open the file. Open your Swatches Panel and there are the spot colors you used in the file! If you want to add additional vector elements simply use one of the colors from the panel and those elements will print on that color separation.
If you open the Layers Panel you will see a layer for each spot color and you can view each layer individually.
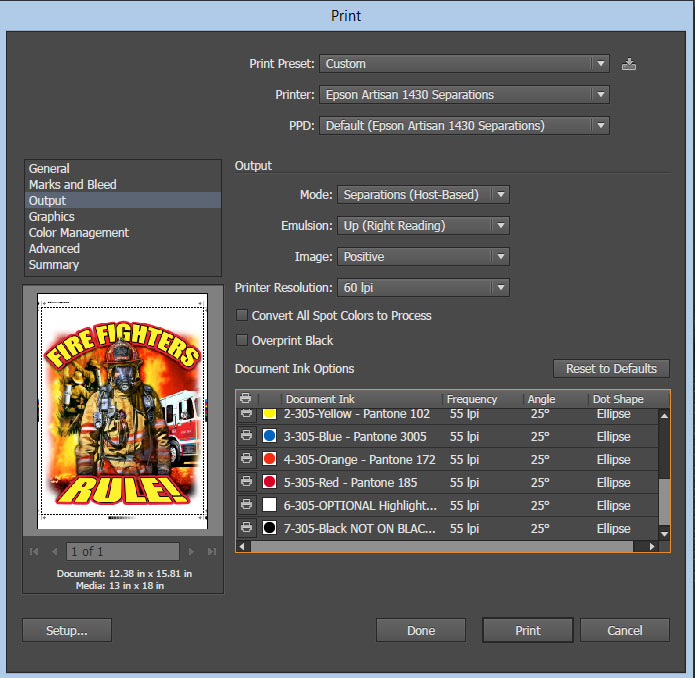
To print go to File/Print and choose your printer with a RIP. Click on Output and select Separations (host based) and you will see your individual separations. Select the halftone frequency, angle and dot shape and print. Easy!
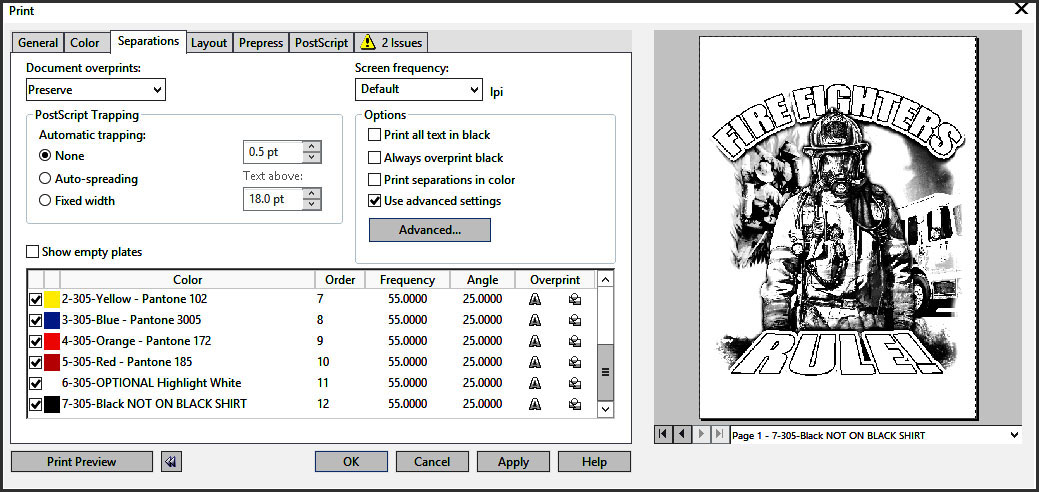
Printing a PDF from Corel Draw X5 or newer to as RIP
Printing from Corel is pretty much the same as printing from Illustrator. Simply Open the file in Corel X5 or newer. The file may look grainy but this is just the Corel low quality display of the image.

Print the file as normal by going to File/Print.
In the Print menu choose the printer are using that has a RIP. In the Color tab select Separations. In the Separation tab click Advanced and set the halftone frequency, angle and dot shape to your liking. You will see all the colors from your job there. Again….. easy!
Printing to older versions of Illustrator or Corel using DCS 2.0 EPS File Format
A long, long time ago (in a galaxy far, far away) a file format called DCS 1.0 (and then 2.0) was created to allow you to move color separations around and use in various programs. DCS stands for Desktop Color Separations. You can save a Photoshop channel separation as a DCS 2.0 EPS file and then Import the file (Corel) or Place this file in Illustrator. If you do it right it is a thing of beauty, but it can be a little quirky.
You only need to use this method if you have Illustrator CS4 or older and/or Corel Draw X4 or older. If you have newer versions use the PDF method outlined above.
Here are the quirks – regardless of whether you are bringing a DCS 2.0 into AI or Corel. This list of quirks is just for your information. When you get a DCS 2.0 color separation file from us we take care of everything and the is ready to us in your favorite graphic program.
-
Keep the channel header name short.
If you have more than 25 characters in the channel header then that particular channel may be absent from the files when you bring it into AI or Corel.
-
Don't use common color names.
Typically DCS 2.0 was original designed to move CMYK files around between page layout programs. If you use any of the color names of Yellow, Magenta, Cyan or Black as the name for a channel – it may not import. Use alternate names like "Spot Black", "Spot Magenta" or anything other than the single word name. DCS 2.0 will get confused if it sees two "Black" channels. Even if you DON'T have a CMYK "channel header" (the Photoshop channels above your separations), your vector program will assume there is one and it won't like duplicate names.
-
Leave the CMYK or RGB channel header.
Typcially "channel separations" are done working with an RGB file and this file is normally left as the "header" above your channnels. Do NOT delete this. Illustrator and Corel can get confused if it they do not see a header that is RGB or CMYK above your channels.
-
Delete any "Shirt Color" channels made by automated programs.
If you use an automated program like T-Seps that includes a "Shirt Color" as one of the channels – delete this before you make a DCS 2.0. This channel simply gets in the way when you bring the file into Corel or AI.
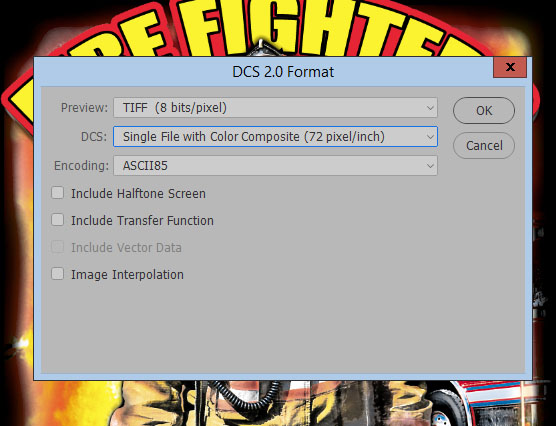
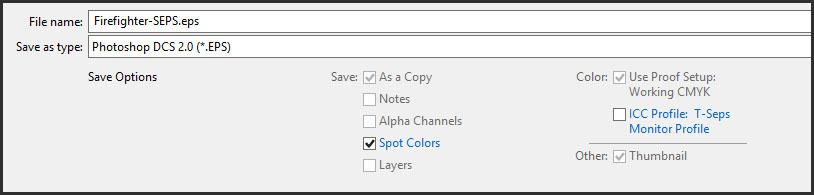
Creating a DCS 2.0 EPS File
In Photoshop do a Save As and select Photoshop DCS 2.0 EPS. You will get a DCS 2.0 Format window and select Single File Color Composite. Don’t worry about checking anything else. In the Save As window make sure Spot Color is checked.
Using a DCS 2.0 file in Corel Draw X4 or older
In Corel you Import the file into a New Document (RGB). Create the New Document that is your film size and 300 dpi.
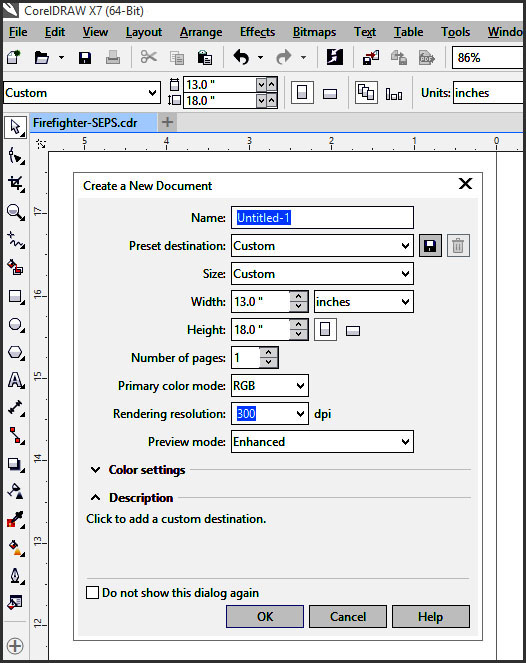
Next go to File/Import. Make sure to check Place as Encapsulated Postscript. The image may look grainy. That is just the Corel display.

The file specific color palette at the bottom may not fill in until you go through the motions of printing. Go to File/Print and select your printer with a RIP. In the Color tab check Separations. Corel will then analyze the image and give you a warning for each color. It adds these colors to the Color Palette specific to this image. In the Separation window you simply select Advanced and then adjust the halftone frequency, angle and dot shape. Put a check box next to the colors you want to print. There will now be as CMYK header but you don't print those colors.
Printing a DCS 2.0 in Adobe Illustrator CS4 or older
Printing from Illustrator is similar to printing from Corel Draw. You have to first make a New Document and it should be your film size and 300 dpi.
Next go to File/Place and choose your DCS 2.0 file and Place it in the center of your new document. Unlike the PDF file you won't see the seps in the Layers Panel. Your colors will show up in the Swatches Panel but they will be mixed in with other colors in that Panel.
To print go to File/Print and choose your printer with a RIP. Click on Output and select Separations (host based) and you will see your individual separations. Select the halftone frequency, angle and dot shape and print.
That is how you print Photoshop Channel Separations from Adobe Illustrator or Corel Draw.


